Ukulele Cheat Sheets: Quickstart Guide
Thank you for purchasing our Cheat Sheet for Ukulele! We hope this can be the start of your long and eventful musical journey with us.
This guide will run you through all of the theory you can decode using our sheets, and will teach you how to read our diagrams and icons which appear across all of our learning materials.
How to read our diagrams
Your Cheat Sheets come with a protective folder, to keep them organised and in good condition if you take them on the road. The folder also contains lots of additional information that will help you along the way.
On the inside flap of the folder you’ll find a guide on how to read our fretboard diagrams.
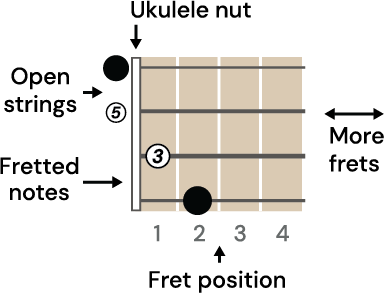
All ukuleles are slightly different but they all have at least 15 frets, at least 4 strings and a nut (which is the name for the bar that holds the strings at top of the neck). These are all shown on our diagrams in a more realistic way than you might be used to if you have used online fret diagrams.
We also show the frets horizontally, with the lowest (G) string at the bottom. Our diagrams are oriented as if you are directly looking down on the neck of the ukulele. When a string is played openly, the notes are shown to the left of the nut. When a string is played at a certain fret, it is shown on the fretboard.
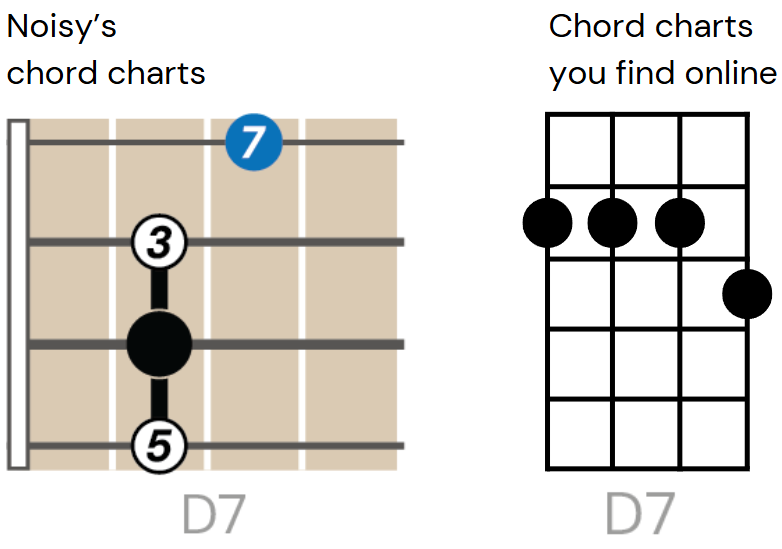
On some chords we will show a thick black line, this is a barre chord, and the black line represents your index finger. Barring is sometimes necessary when playing further up the neck, your finger is essentially replacing the ukulele nut.
Intervals
One of the most important things to remember when reading our diagrams is we do not tell you where to put your fingers. There are often multiple ways to finger chords which will change depending on the size of your hands, the type of ukulele you are playing, or just whatever is most comfortable. We encourage you to find the best way to finger chords yourself, and there are plenty of resources online that can help.
To understand more on how to finger chords, refer to this short video from us.
The numbers on our diagrams instead correspond to intervals.
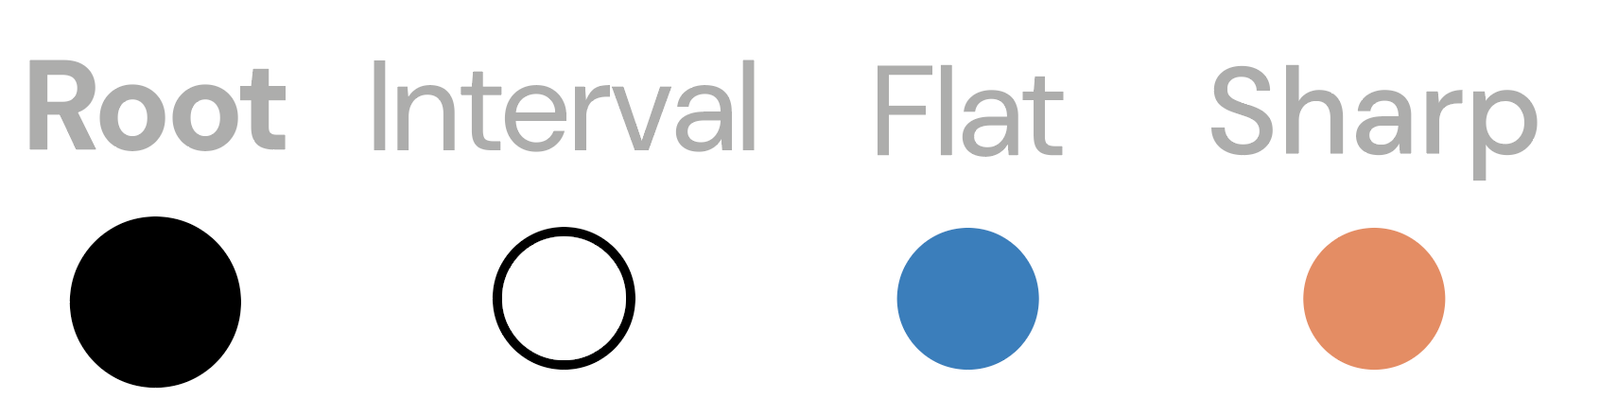
We use two systems to represent intervals, numbers and colour.
The black dot without a number is the root note. This is the note that names whatever chord or scale you are playing. So for example, if you are playing a C chord or C scale, the black dot will be a C note. These are slightly bigger than the other intervals to make them easy to find.
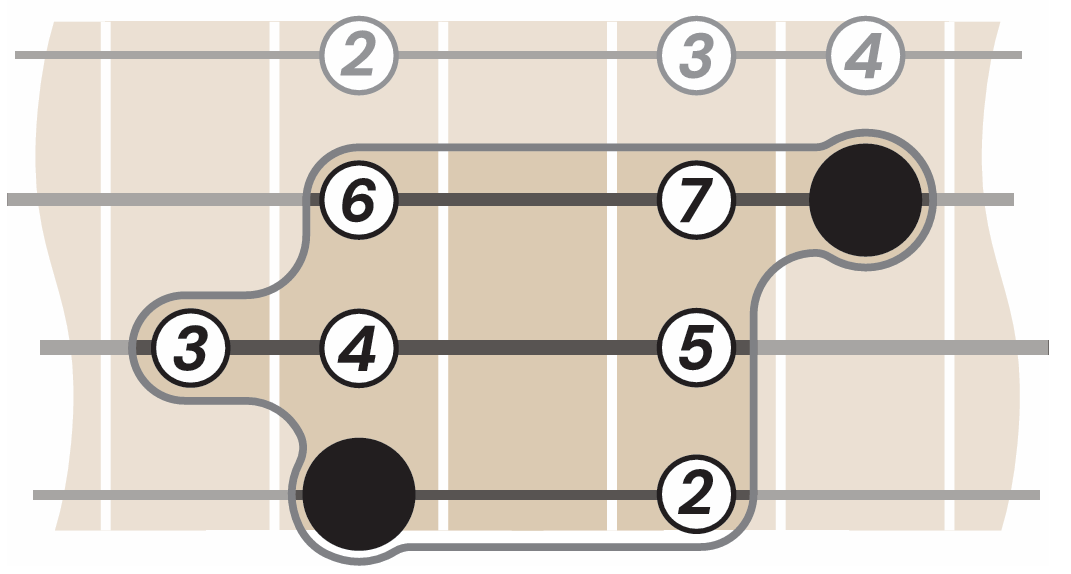
Numbers: The numbers inside the circles represent intervals. These all correspond to the root note, so a 2 is an interval of a 2nd from the root note, a 3 is a 3rd from the root note, etc. There are 7 intervals in a full scale, so the interval after the 7th is the root note again, up one octave.
Colours: The numbers inside white circles are all the intervals of the Major scale. This is the default, the scale from which all chords and scales are derived. Intervals from the Major scale are modified to make other chords and scales. When an interval is flattened, it is shown as blue. This means it is played one fret down and is tonally one half-step lower than the Major interval.
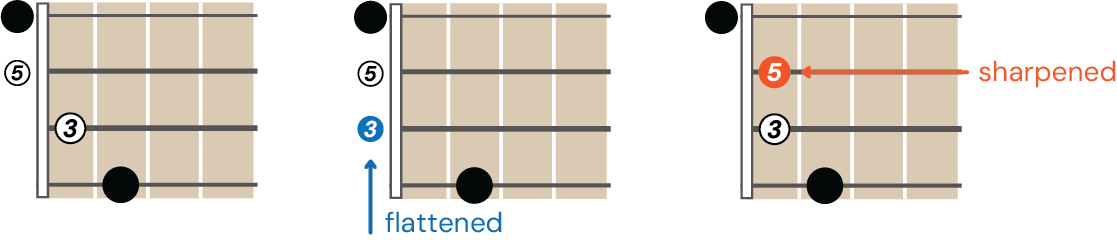
When an interval is sharpened, it is shown as orange. A sharpened interval is moved up one fret, or half-step from the Major interval. These colours make it easy to see exactly what intervals have been modified from the Major scale.
This same visual system is used across all of our products for labelling intervals across chords, scales and keys.
Chords
The first Cheat Sheet you’ll see is the Chords. This is what every beginner ukulelist wants to get to quickest, so we’ve put it at the front. The root notes, which name the chords, are shown on the left. The chord types are shown along the top. For each chord we show 7 different types. The major and minor are highlighted because those are the ones you’ll be playing the most when jamming or writing songs.
This is where you will first see our magic intervals in action. Look at A major.
A major
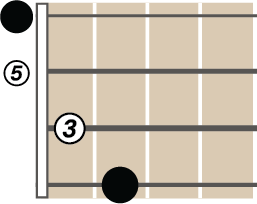
Under ‘Major’ you can see the structure of the major chord - 1(root)—3rd—5th. This is the same for that entire column, so every major chord uses that structure, only the notes change. Play the A major chord, now look at A minor.
A minor
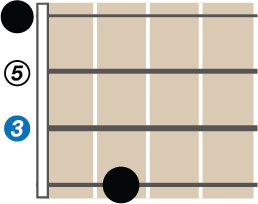
The A minor chord has a blue 3rd interval, meaning it is one fret lower than the 3rd interval from the major chord. Again, this interval sequence is identical for all minor chords. Play the A minor chord, you only had to move one finger from the A major. This is the same for all chords, as long as you know where the 3rd is, you will instantly be able to play the minor version.
Every other flavour of chord just adds or modifies intervals from the major chord.
Chord Formula
Open up your folder again and look on the left hand side. The ‘Chord Formula’ dives deeper into this idea of modifying intervals from the major chord to make others.
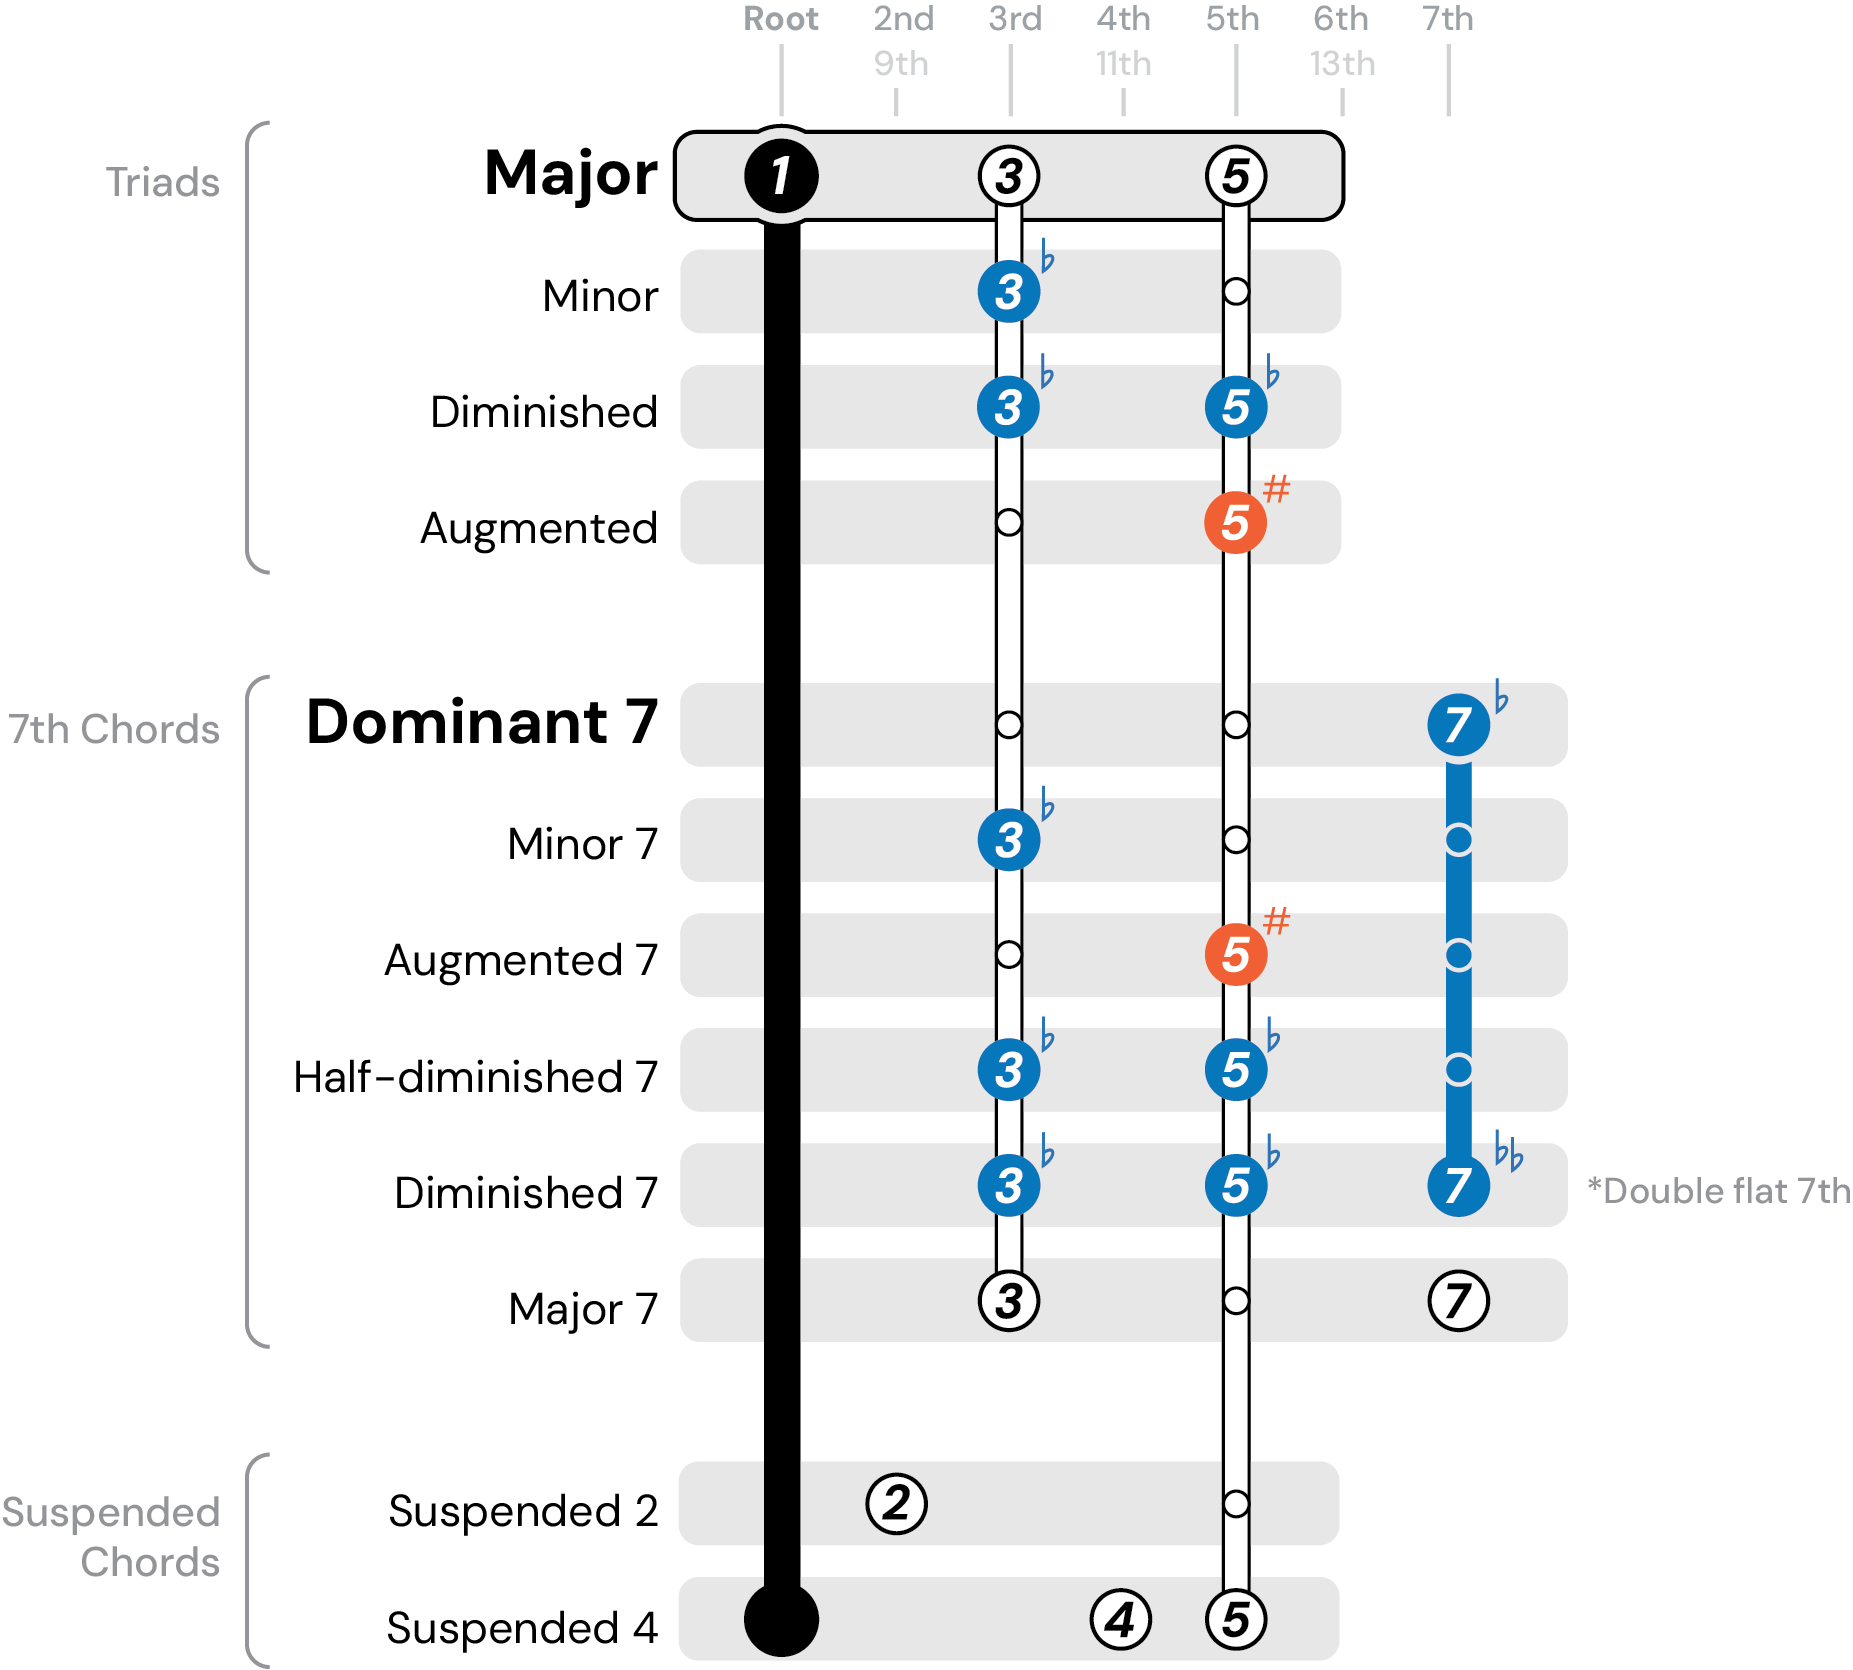
The Major chord and its intervals are shown at the top of the Chord Formula. From that, the intervals continue down through the other types of chords, highlighting when changes occur. Read each chord horizontally.
The root note never changes. A small circle inside a vertical line means that the interval is unchanged from the major. A blue or orange interval means it has been either flattened or sharpened, respectively.
Take out all of your cheat sheets and you will see 4 variations of ‘A’, connected to the first 4 types of chord shown in the Chord Formula.
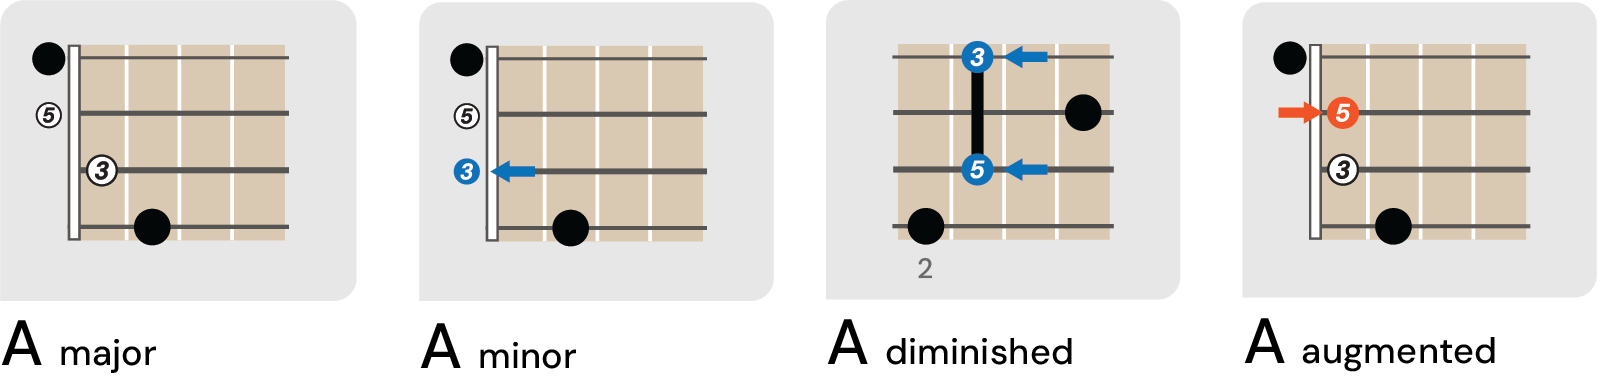
You’ve already played A major and minor, two more kinds of chords are shown here. Try playing these, and listen to how the flavour of the chord changes.
You can play any chord and apply the same adjustments and it will still work. Play the same exercise with a different chord from the Chords cheat sheet. That’s why learning intervals as you learn the chords is so important.
Scales
The next cheat sheet is scales. Scales can be very overwhelming to beginner ukulelists so we have broken them down into the most bite-sized chunks possible. Start with the Major scale. The smaller diagram on the left shows the scale over 4 frets, with the first octave highlighted.
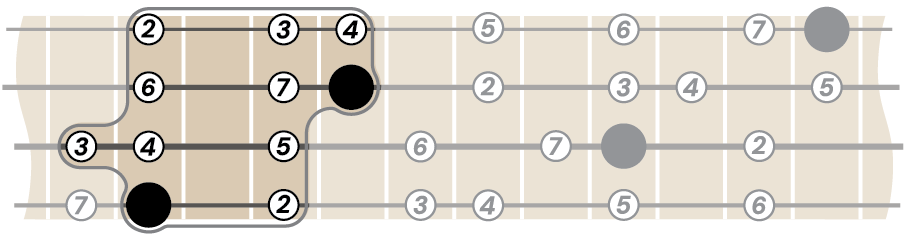
Play this highlighted octave shape. Not sure where to start? That’s the trick with these scale diagrams, they’re universal! You can play this shape anywhere up and down the neck and it is still a major scale, it just depends on what fret you start on.
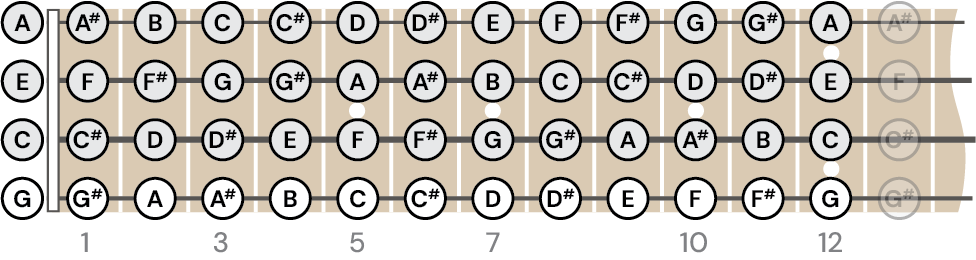
You can use the full fretboard diagram on the Chords cheat sheet to help you find a root note to play your first scale. All of our scale diagrams start on the C string.
The larger diagrams on the left show the scale patterns across the whole fretboard. Use these once you’re comfortable with the single scale shape to branch out and explore more of the fretboard.
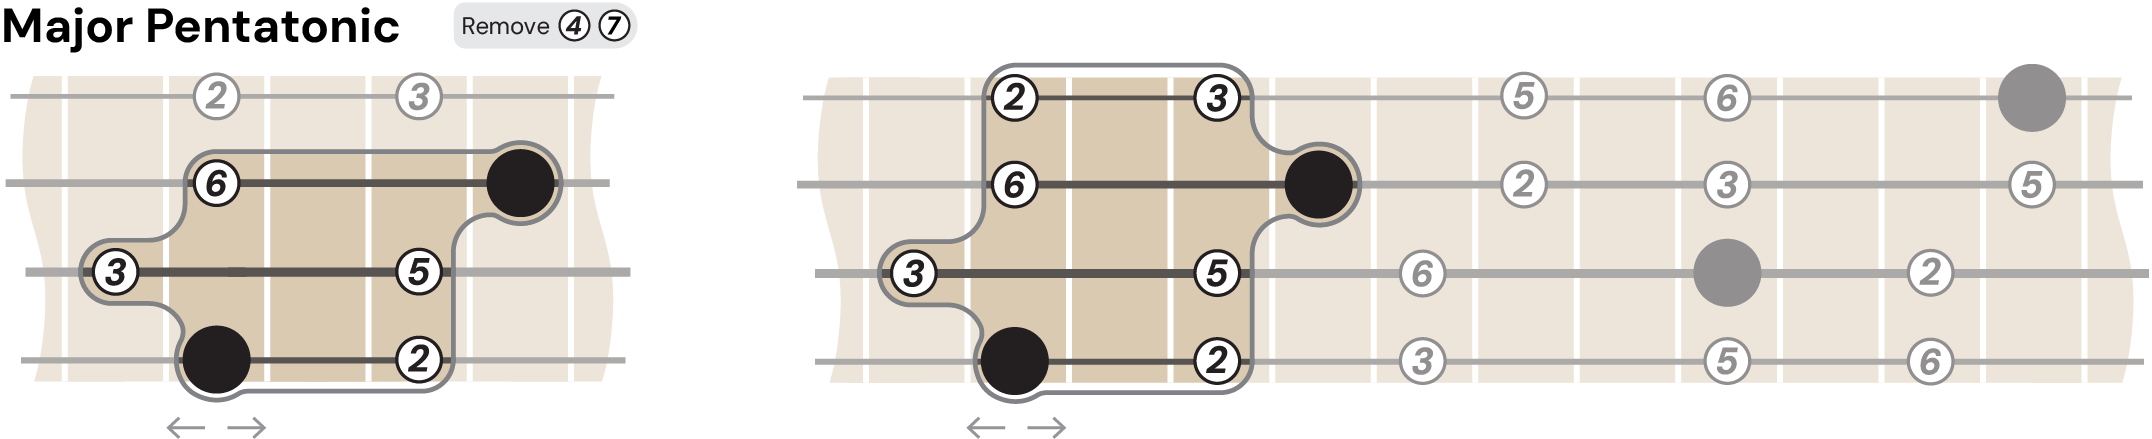
The major pentatonic scale is even easier to play since you skip notes, this one is great for soloing.
The minor scale has 3 flattened intervals compared to the major scale, and the minor pentatonic works in the same way by skipping 2 of the notes.
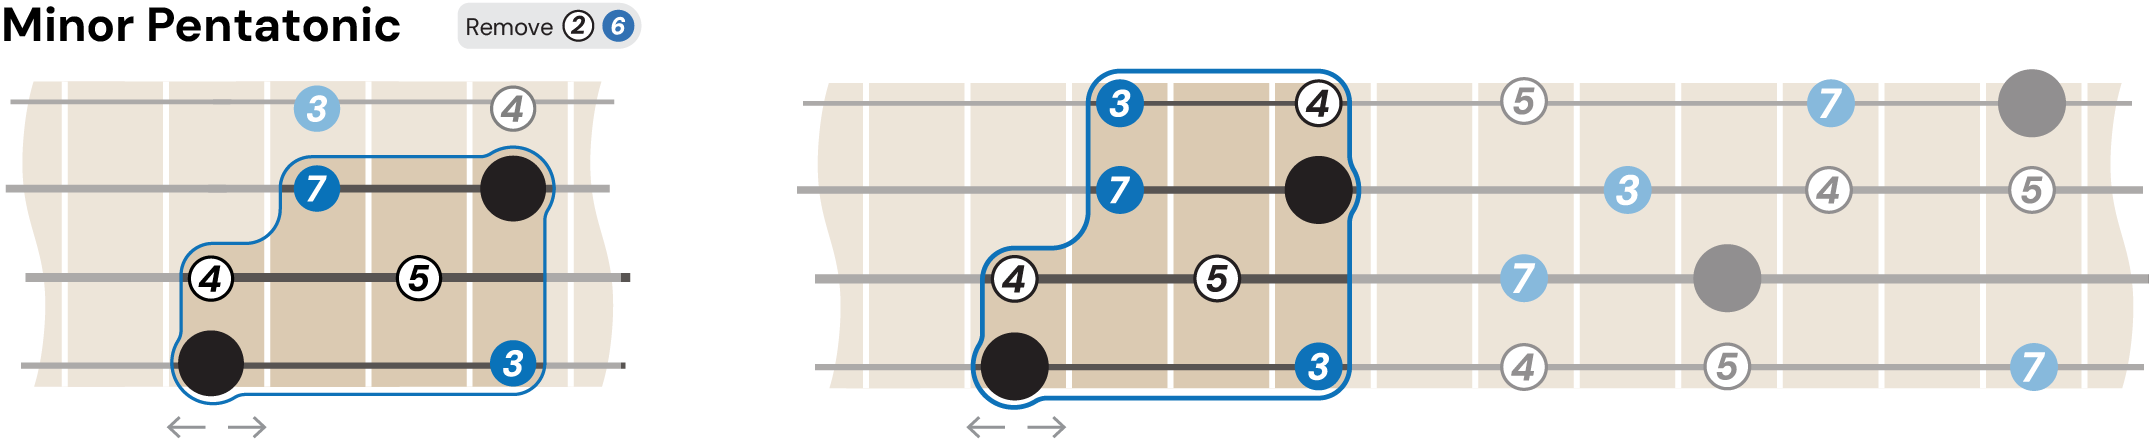
Once you’re comfortable with the pentatonic scales, you only need to add 1 note to them to play the blues.
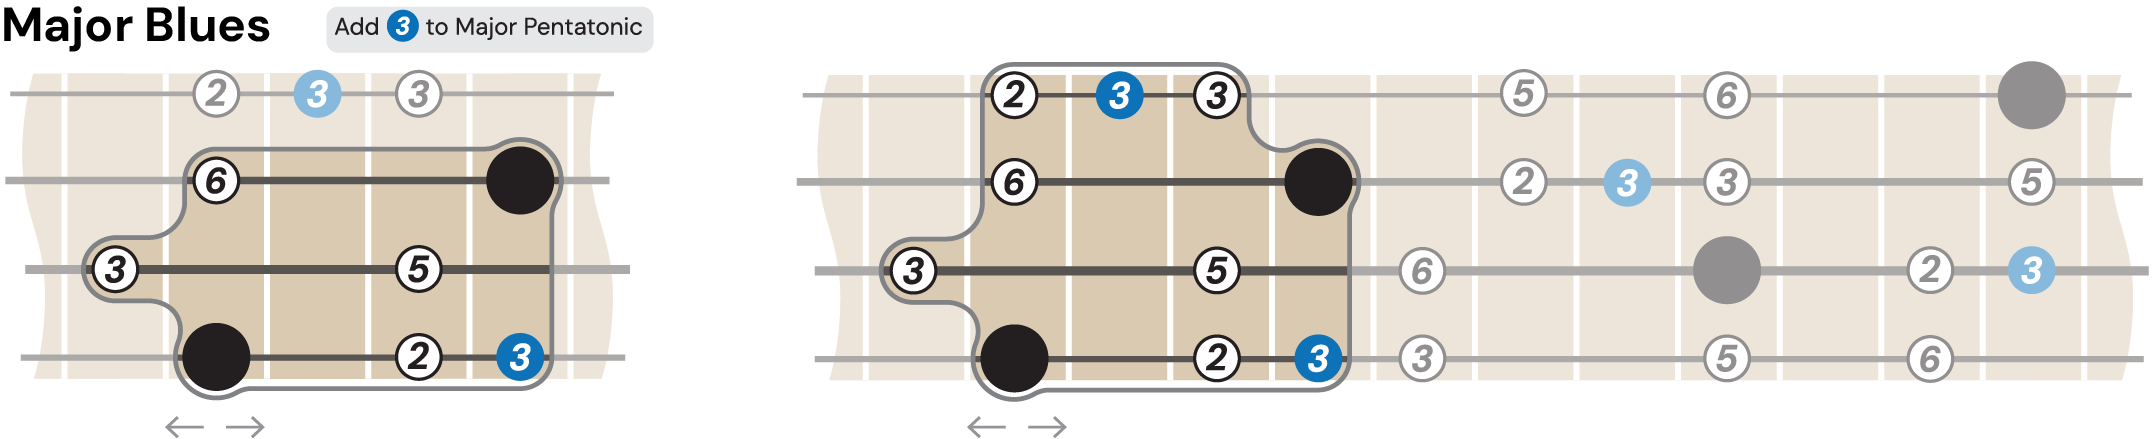
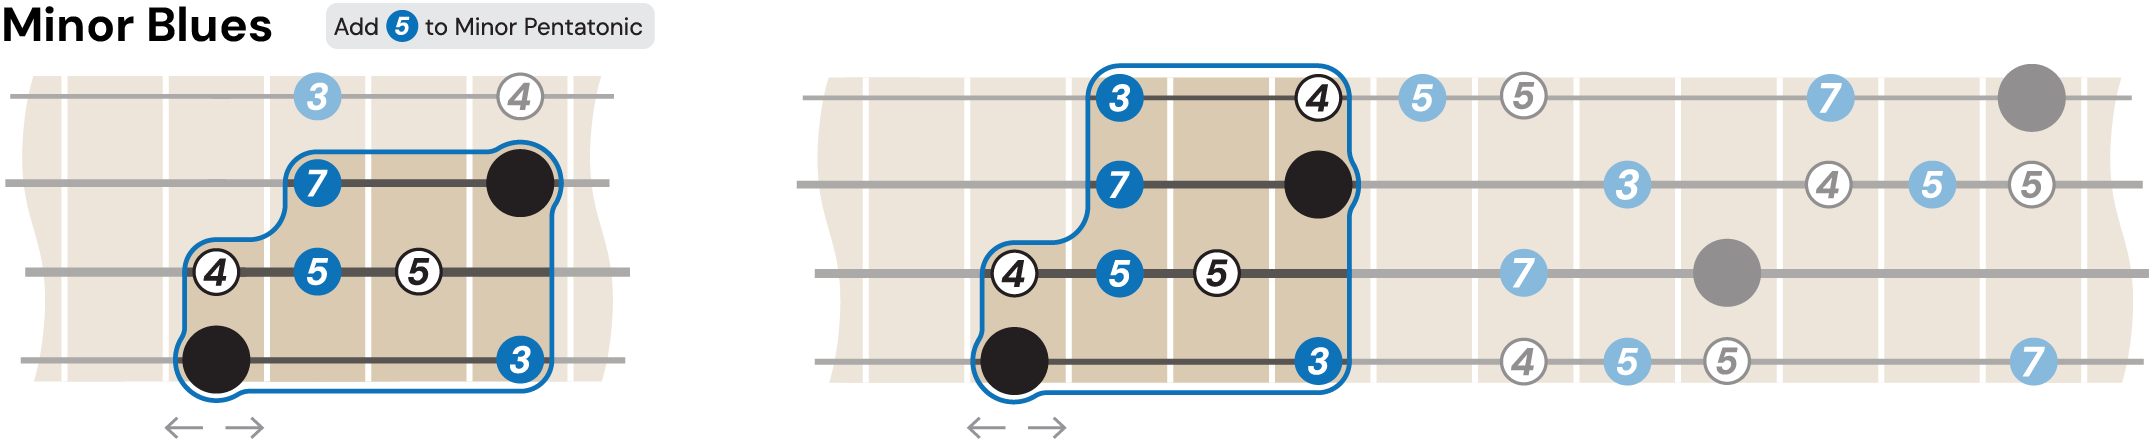
Our scales sheet includes an extra tip on mixing major and minor scales for more melodic range. This trick is a soloing secret that will quickly have you sounding like a pro!
Chords in Keys
This may look like something from a sci-fi show but don’t be scared. This is the circle of fifths and it is one of the best ways to learn lots of music theory very quickly. Almost all music is written in a key. A key is just a collection of notes that form chords that sound harmonious with each other.
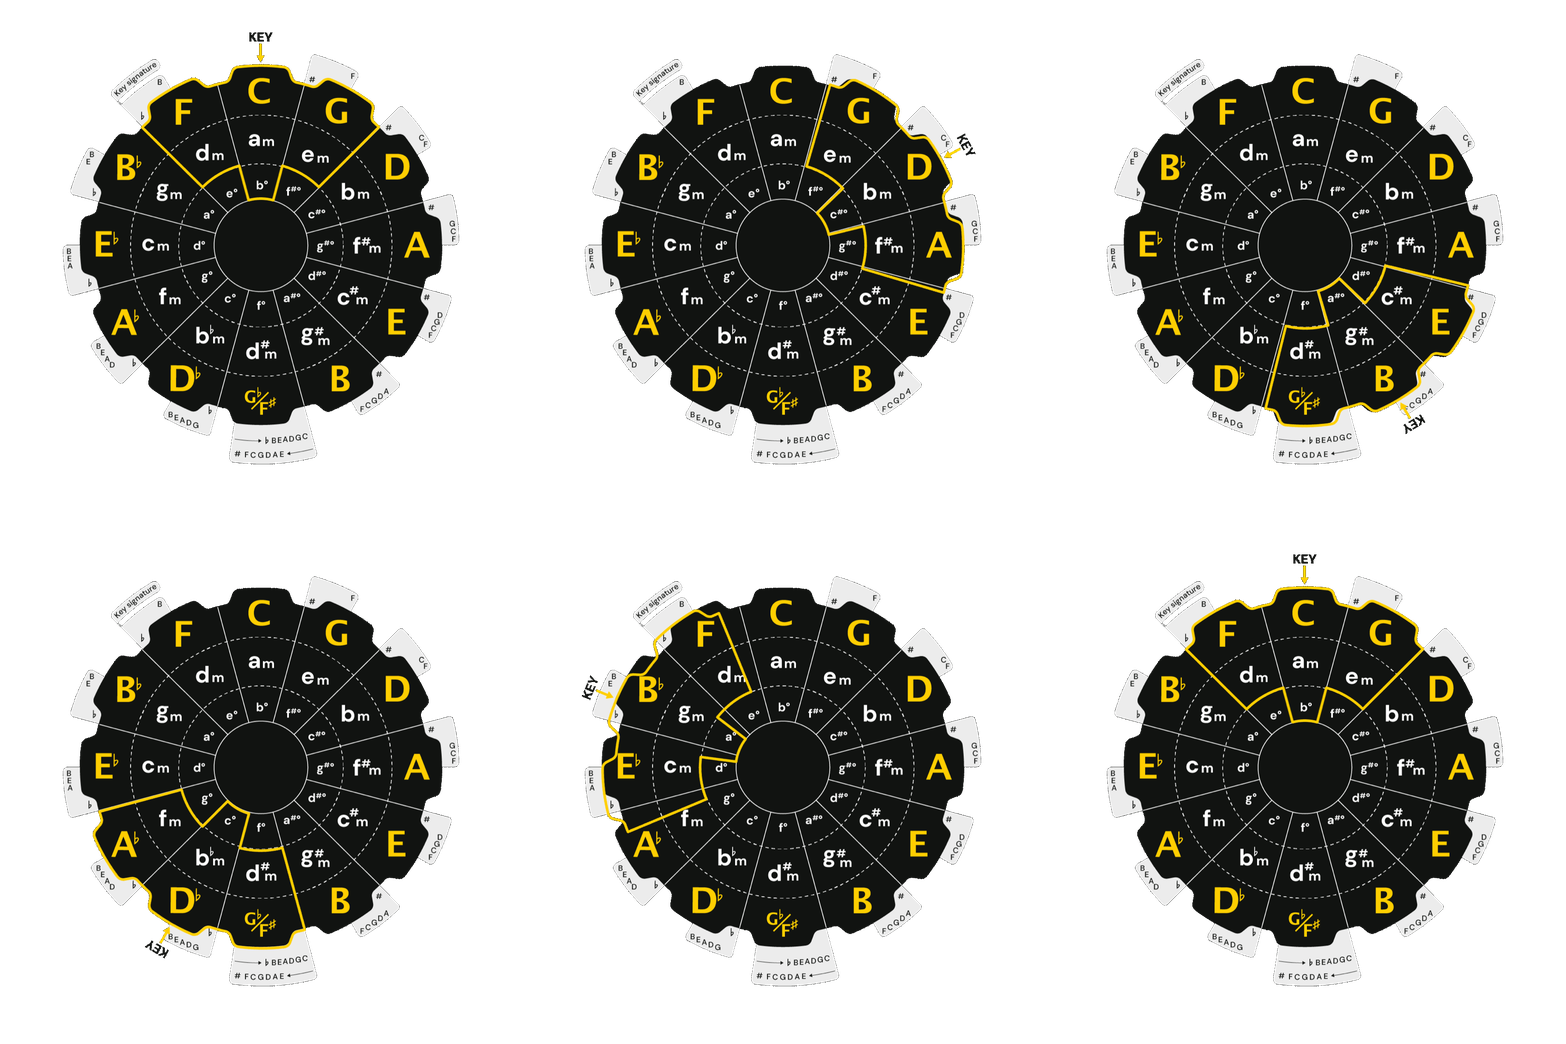
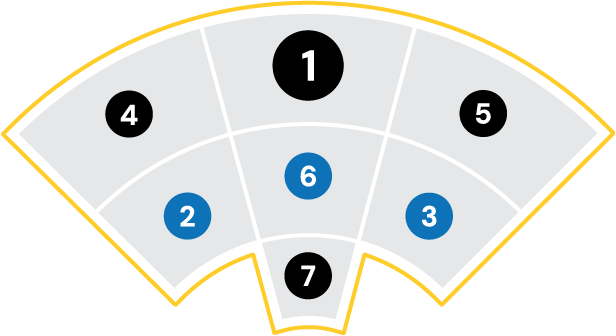
Remember the progressions you played on the Triads sheet? Those were 1 > 4 > 5 progressions. In the grey diagram in the top right, you’ll see those in the outer ring. Those are major chords, the inner ring has minor chords, and the central ring has diminished.
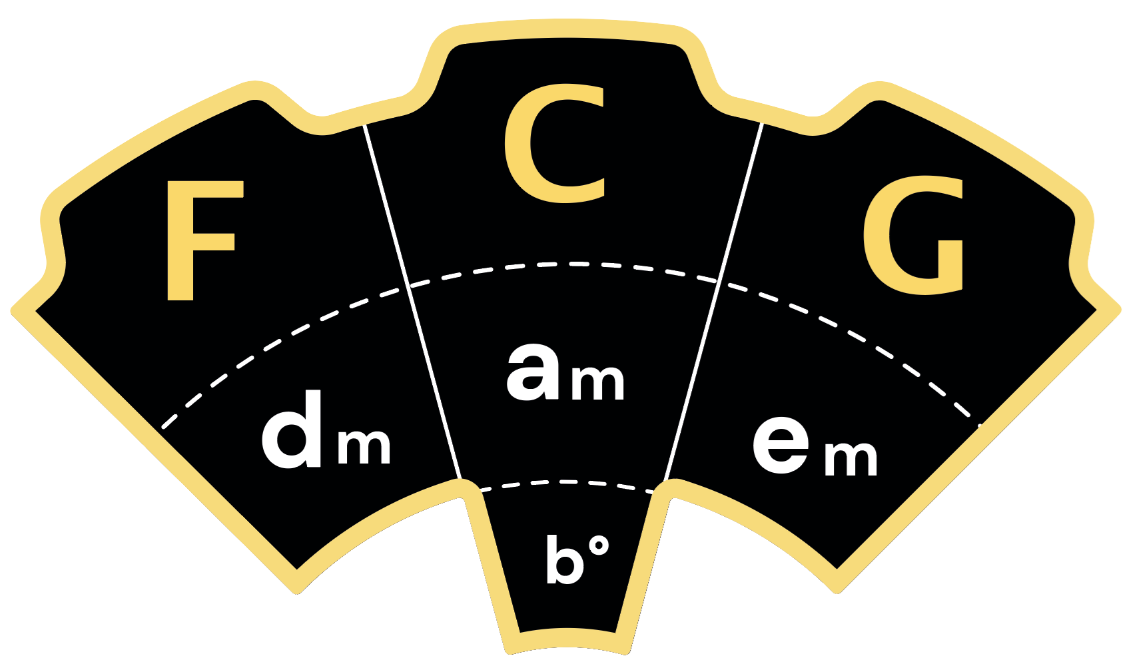
We have highlighted the chords in the key of C in the yellow shape at the top. Each key has 3 major, 3 minor and 1 diminished chord, and they follow the same pattern. This means in the key of G, D major is the 5, C major is the 4 etc.
On the other side of the sheet, 6 keys are laid out with all 7 chords in each key shown. Play any assortment of chords in a single row and you’ll be playing in key. Use this sheet to write your own progressions, or transpose from one key to another.
Find much more info on keys and chord progressions using our Circle of Fifths decoder and accompanying book & course!
How to Play More!
There is a lot of info on these Cheat Sheets, and our aim with each one is to give you something that you can just play immediately, learning the theory as you go. Look out for the ukulele icons, these basically say:

Trying to learn every concept we cover on the Cheat Sheets at once would be overwhelming, so we encourage you to take it one step at a time.
Remember:
Every chord is based on 1—3—5.
All interval patterns can be moved up and down the fretboard to play different chords and scales.
Chords can also be played as arpeggios.
Any major scale can turn into a minor scale by starting on the 6.
Most importantly, music is most fun with others, and mistakes are part of the process!
Further References
The Cheat Sheets are a lot of people’s introduction to the world of learning with Decoder. Here’s some more of our products that can help you dive deeper into the concepts covered in the Cheat Sheets.
Try out Piano Chord Compass to learn more about chord formula and structure.
Try our Guitar Chord Compass to find chords and intervals everywhere and explore up the neck of the fretboard.
Try our Circle of Fifths to write and transpose songs effortlessly.