Let's Get Noodling: Your Friendly Guide to Guitar Solos
Hey there, fellow guitar enthusiast! Ever look at guitarists ripping amazing solos and think, "Wow, I wish I could do that!"? Well, guess what? You absolutely can! Soloing might seem daunting at first, like something only pro guitarists do on huge stages with flamethrowers, but it's actually something anyone can enjoy, right in the comfort of their own space. To be able to solo just requires a lot of ‘noodling’.
What's This "Noodling" All About?
Let's talk about "noodling." Think of it as your guitar's version of doodling. It's not about performing for a crowd or playing perfectly; it's about exploring, having fun, and making music that makes you happy. Noodling is your chance to grab your guitar, plug in (or not!), and just let your fingers wander. It's a private jam session with yourself, where there are no rules and no judgment.
Noodling a solo is one of the best opportunities to really connect with a song. The other instruments step back, keep the rhythm and chords going steady, and the rest is up to you. Soloing is a daunting thought for beginners. You cross the line between being an equal part in a band with the other musicians to being the sole focus of attention and carrier of the performance. That’d make any beginner guitarist sweat! However, this transition from ensemble player to center stage doesn’t require an audience and can be part of your everyday practice. Embracing the spirit of "noodling"—exploring and having fun with the guitar without pressure—can bridge the gap between basic skills and confident soloing.
You are ready to noodle but you are not sure how to start.
Find A Piece of Music
You need to find a piece of music that you would like to noodle over. There are 3 main options;
A song
An existing backing track
Record a ‘loop’ for yourself.
I recommend all three! They each offer different advantages.
A Song
It is always fun to play along to an existing song. Simply find a recording that you can play on loop. Spotify has over 100 million tracks to choose from, hopefully one of them can match your mood. The downsides: Songs are very polished and often have little space for you to play into. You can’t choose your key
Backing Tracks
YouTube has hundreds of thousands of backing tracks that are easily filtered for genre, tempo and key. This makes it easy to find tracks at your level that offer an easy onramp to noodling. They will typically be instrumentals that will allow you to noodle over them like a pro.
Record Yourself
The last option is to simply record yourself. There are lots of options to facilitate this including the phone in your pocket. Looping pedals and Apps allow you to instantly record and playback loops for you to noodle over. The benefit to recording yourself is that you can control everything about the recording, including style, chords, key, tempo, rhythm and any other nuance which you feel is important.
Find the Key
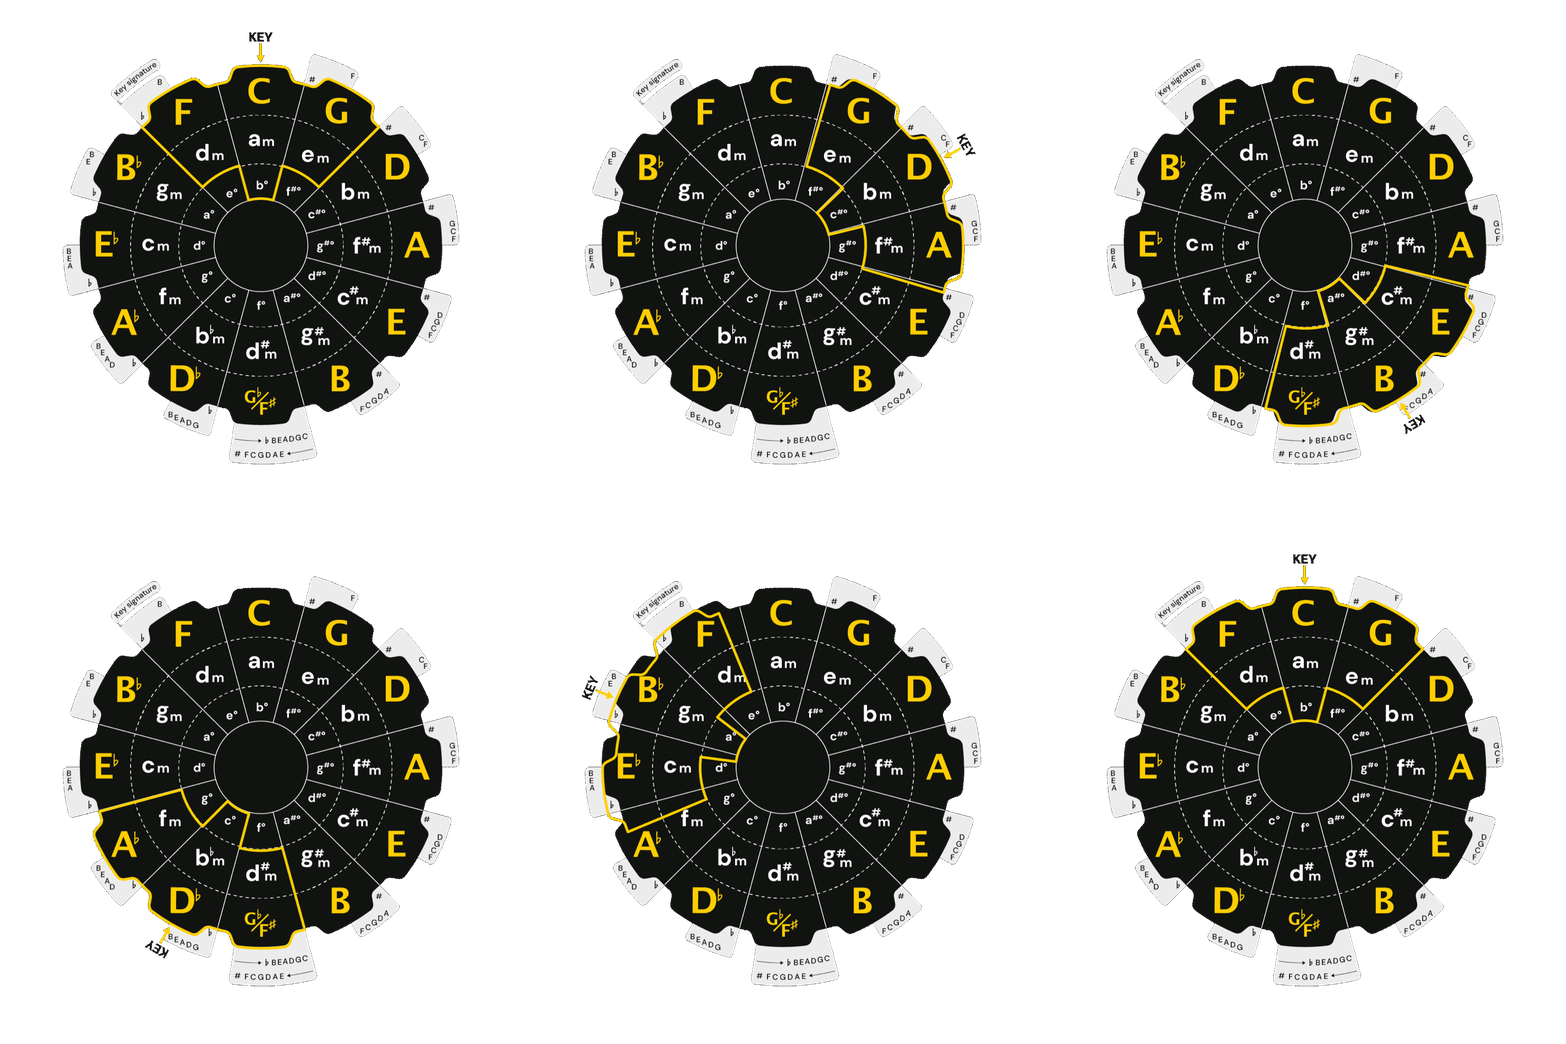
Once you have a piece of music that you would like to noodle over you need to know what key the music is in. Almost all popular music is written in one key. If you are not familiar, a key takes 7 scale notes which sound great together and establishes a tonal center or home note. Within the key, 7 chords can be formed from the 7 scale notes. Diatonic keys contain 3 Major chords, 3 minor chords and one diminished chord. The best part about this is that you won’t even need to remember all 7 notes or chords, to play a solo.
Choose a Scale
Now we have a key, we need to decide what notes we’re going to play. That is where scales come into play. A scale simply tells you what notes are being played.
Listen to almost any well-known guitar solo and you will hear the band behind the guitarist playing a repeating pattern of chords. This consists of 2 or more chords played back and forth to give the guitarist a simple and strong backing track. One scale is used to play over multiple different chords. This is a key element of soloing. As long as the song remains in the same key, you as the soloist only need to choose notes from one scale.
The easiest scale to start soloing with is the pentatonic scale which is an abbreviated version of the full scale. If the music that you want to solo over is in the key of G major. That key is based on the G major scale. The G major pentatonic scale removes 2 of the major scale notes leaving only 5 notes to play. This one scale can be played over all the chords in the key of Gmajor: G, am, bm, C, D, em and Fdim.
The hair on your neck might be standing up… “Scales!? Not scales…” But don’t worry, this will be easier than you expect. There is also another way to think about the pentatonic scale. Sticking with the G major scale. You already know how to play the G major chord, you just need to add 2 more notes to the notes in G Major to play the G major pentatonic scale.
A lot of famous guitar solos are based on the pentatonic scale. It removes the half-step intervals from its parent Major or minor scale, which reduces dissonance and makes it great for improvisation, coming up with melodies, and soloing!
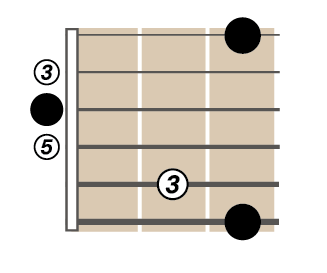
Play the G Major chord, but this time play each string one after the other. We’ve shown the intervals in the chord below: 1—3—5
To play the pentatonic scale, you only need to add the 2nd and 6th scale degrees to this shape: 1—2—3—5—6—1
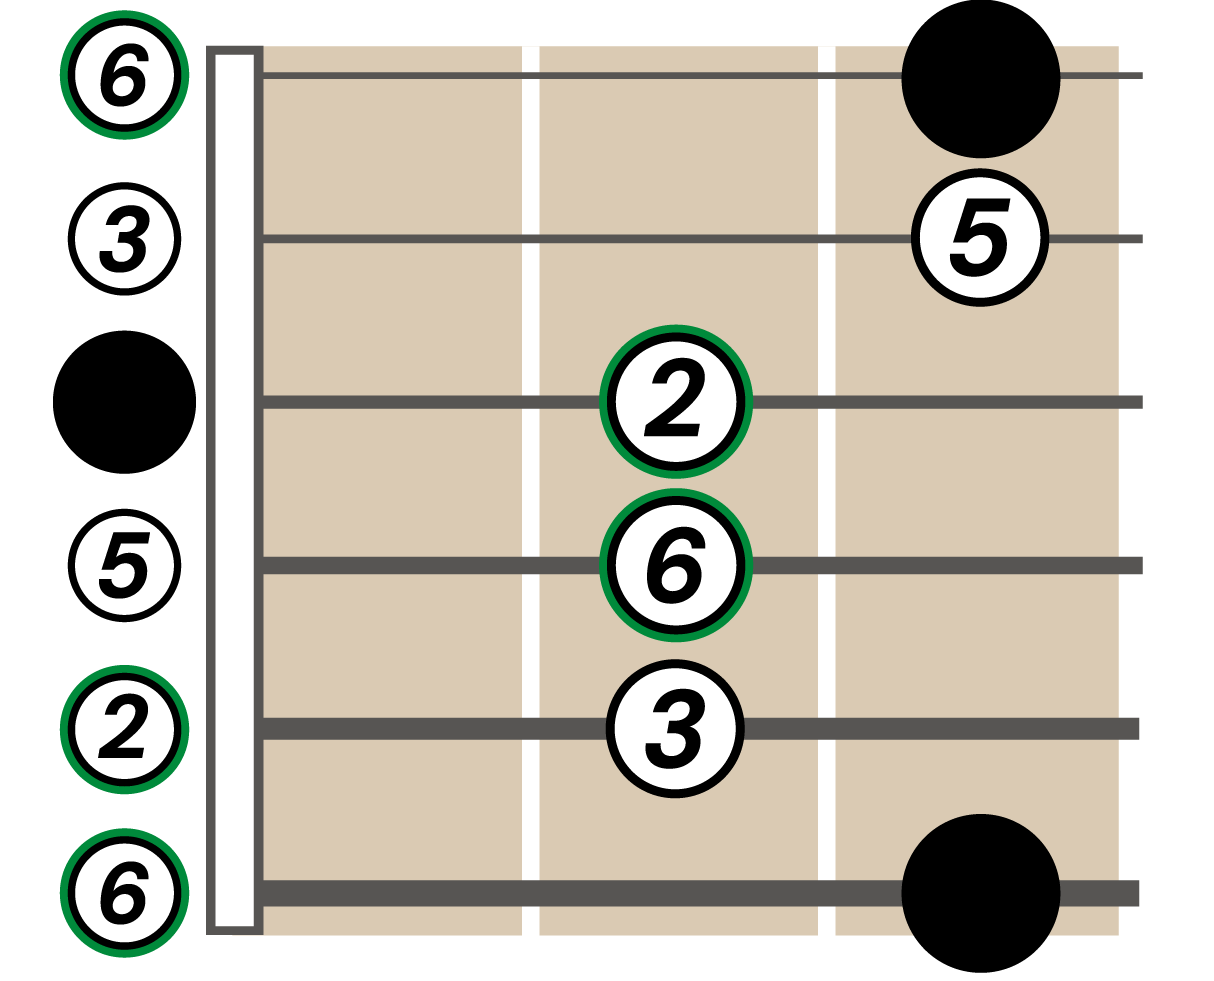
Now try playing this shape - this is the G major pentatonic shape. Play it a few times, play it in different orders, get used to it, get to know it, find the intervals within it that you think sound good. Pentatonic scales contain 2 minor 3rd intervals: between the 3 and 5, and the 6 and 1. This means you can play melancholic sounding melodies using them, even over a Major chord, and it’ll still be in key.
Find a Motif or a Riff
Most songs with a lead guitar part will have a characteristic riff. This is often what makes a song catchy or memorable. (examples) If your song doesn’t have one already, the pentatonic scales we have been using are a great framework to work one out. Choose a few notes from the scales, you only need 3 or 4, and it’s best to include the root note to emphasize the key. This is important because we will be using this melody as our anchor on the fretboard.
Here are some examples:
1. Smells Like Teen Spirit - Nirvana
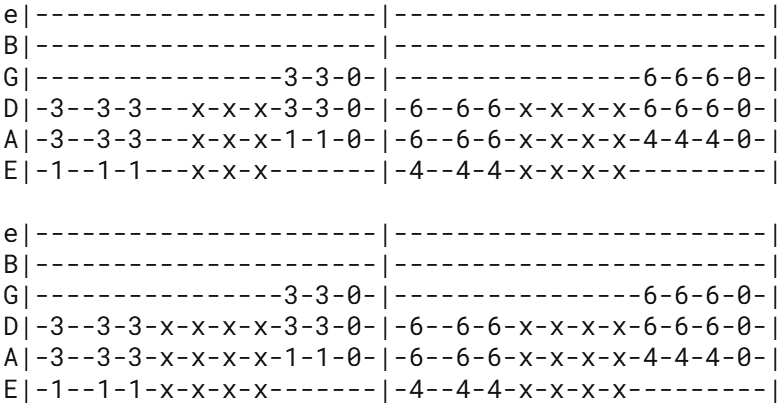
2. Beat It - Michael Jackson
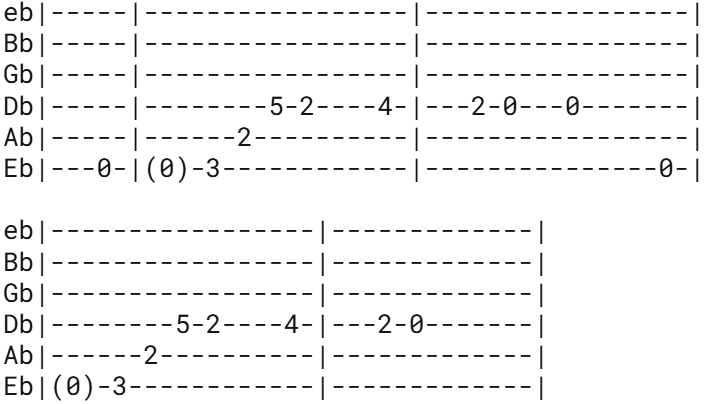
3. Sweet Child o’ Mine - Guns n’ Roses
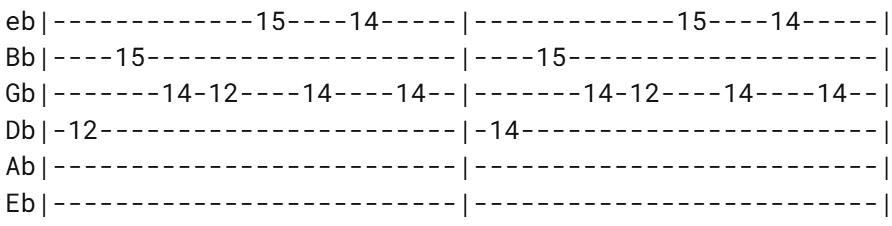
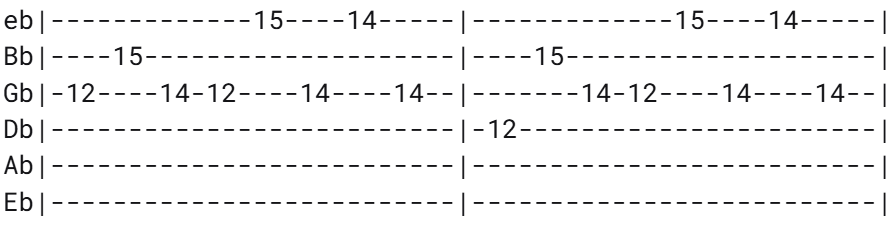
Get real familiar with this riff, and don’t just stick to the first few frets of the neck. If you start on the E string, you can move it up 8 frets to start on the A string instead, or 12 frets for a full octave. Just remember your root note, the rest of the shape will follow (remember the intervals shift 1 fret up on the B string).
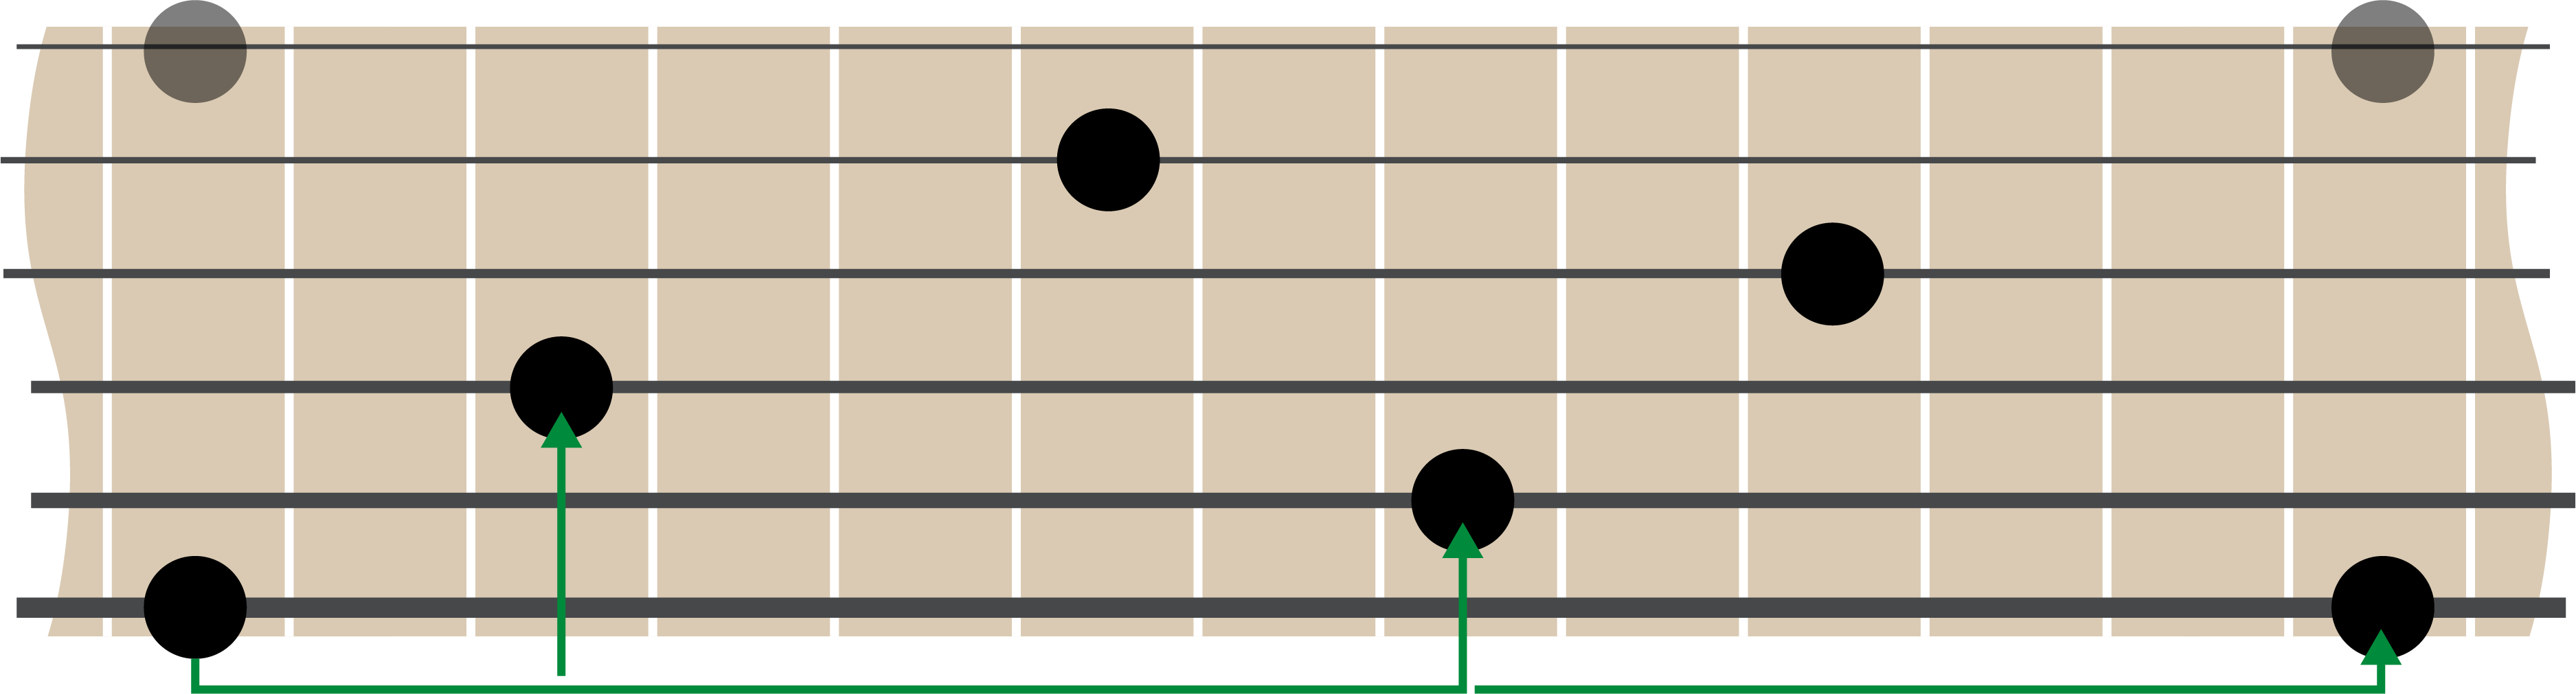
Make sure you can always find the start of your riff, because we’re going to be wading out into the deep dark waters of the fretboard in the next step, and we’ll be using your riff as an anchor to return to if you get lost.
Moving out across the strings
You’ve probably seen Van Halen and Slash dextrously dance over the frets during solos like their fingers are possessed. This is just muscle memory! There’s a very high chance they’re using the techniques we will learn in this chapter.
This is where having a Guitar Scale Compass will really help out, but you don’t need one to do these exercises.
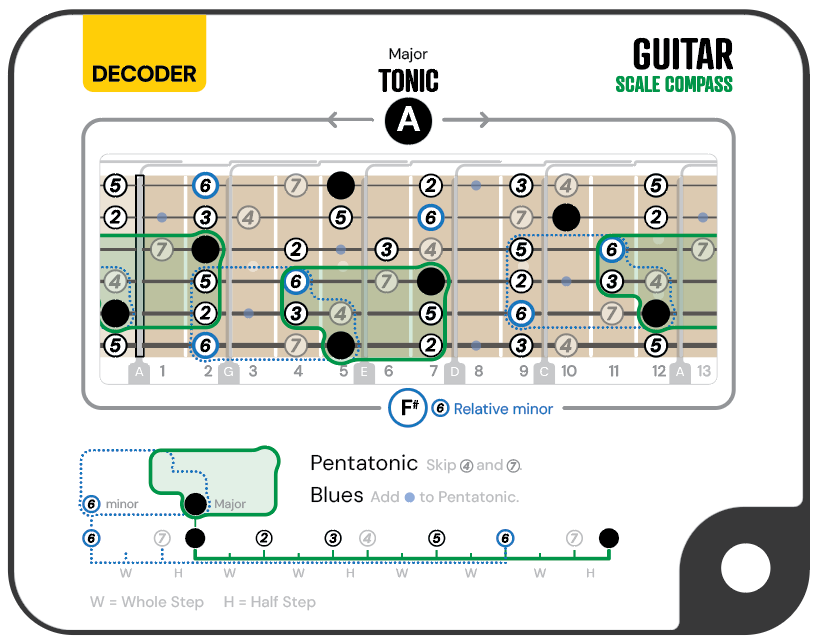
First we are going to break out of the box using the pentatonic scale. You can use this shape with any root note. If you’re in a minor key, or playing over a minor chord, just start and end on 6, 3 frets below.
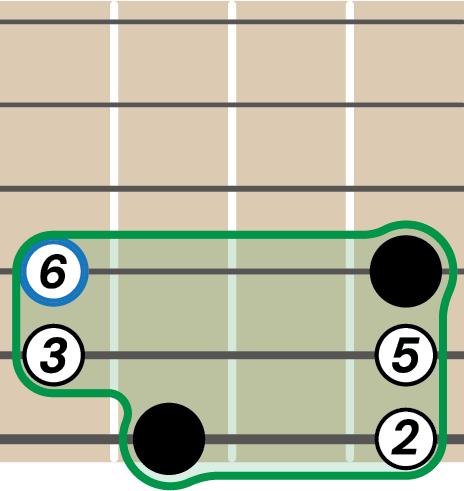
Really, any shape is just a suggestion and is usually the most convenient way to play a set of notes. If you find a note outside of the shape that sounds good, play it! If you stick to the pentatonics, you will find they are very forgiving in terms of harmony. Just remember the B string rift!
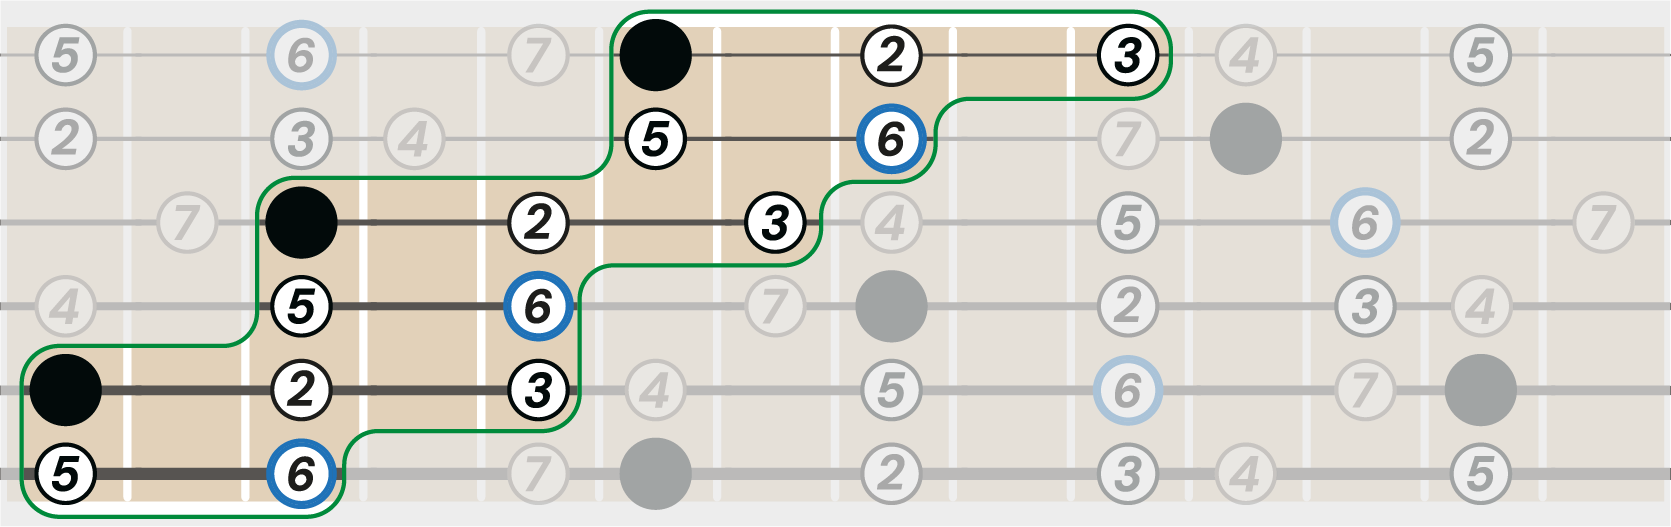
This is a way to play those sweeping, fret-spanning flourishes that the guitar heroes have all mastered. Remember, if you’re riffing around far up the fretboard and get lost, you can always return to the riff you made in the previous chapter. Try branching off in a few different directions and see where the melody takes you.
Mixing Major and Minor scales
This is a good way to make a really memorable and distinctive sounding solo or riff. Don’t get locked into shapes, they are just a quick way to step into scales but are really just suggestions.
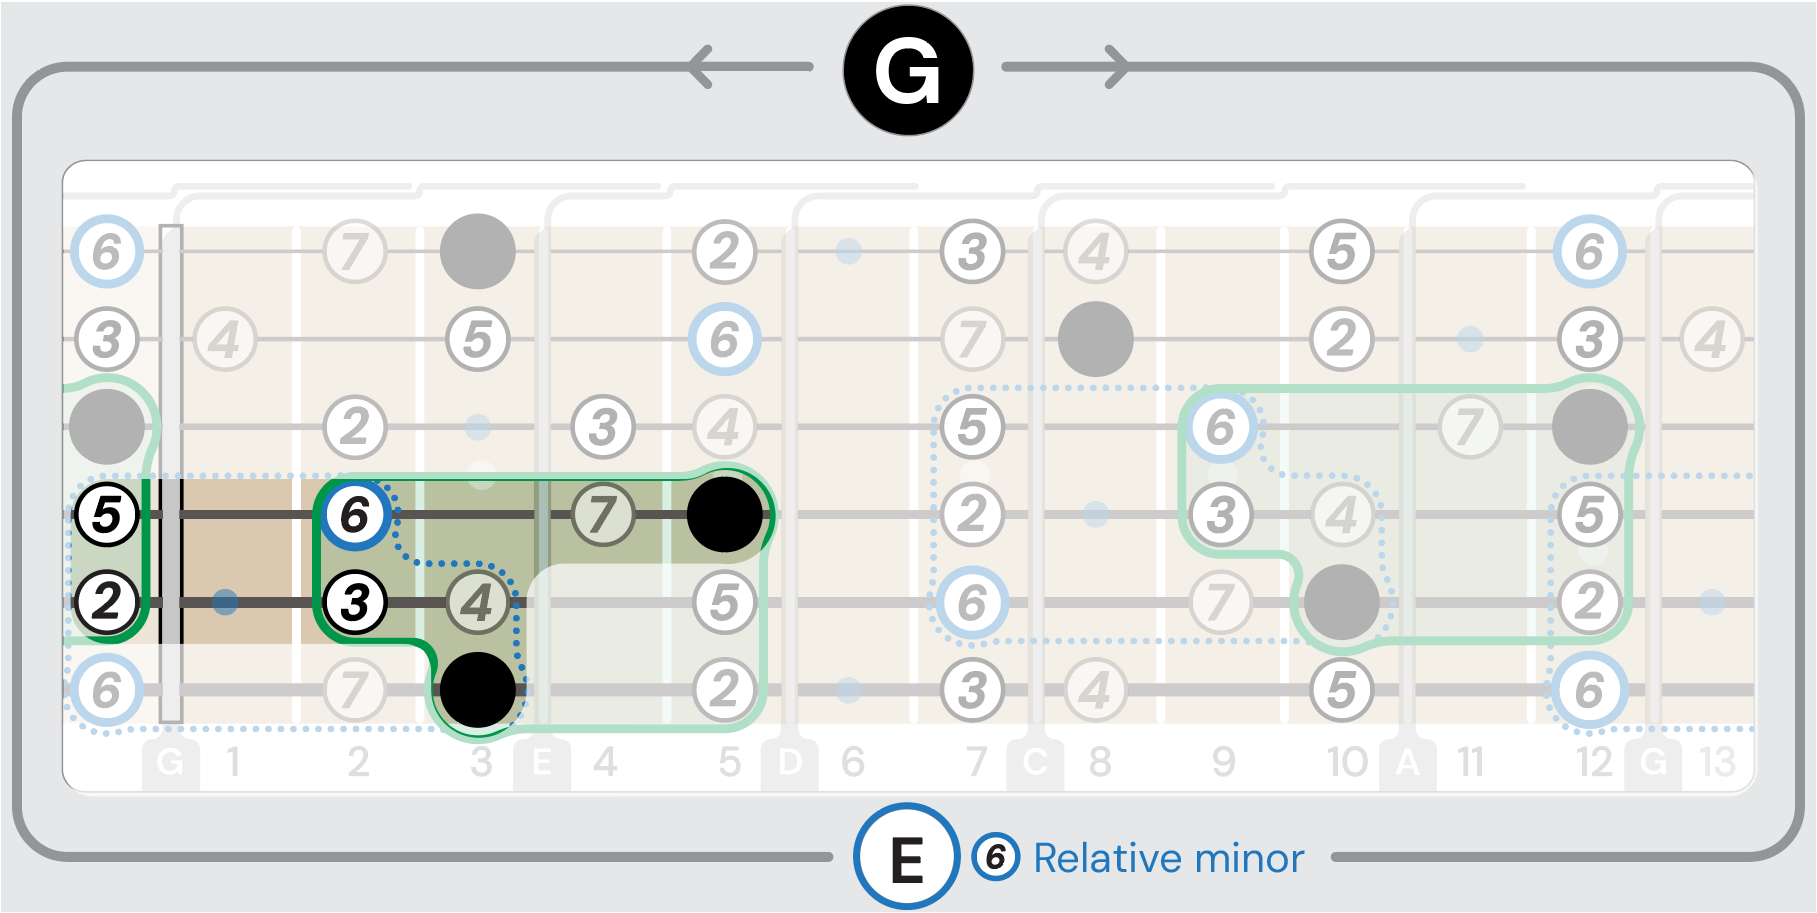
Remember, the Major and minor scales use the exact same notes, the only thing that changes is which note you emphasize as the tonic note of the scale. Try this shape below, where we start on the 6 and move through parts of the Major scale. Play it over a minor chord and then when the chord changes to Major, emphasise the Major tonic and start playing from there.
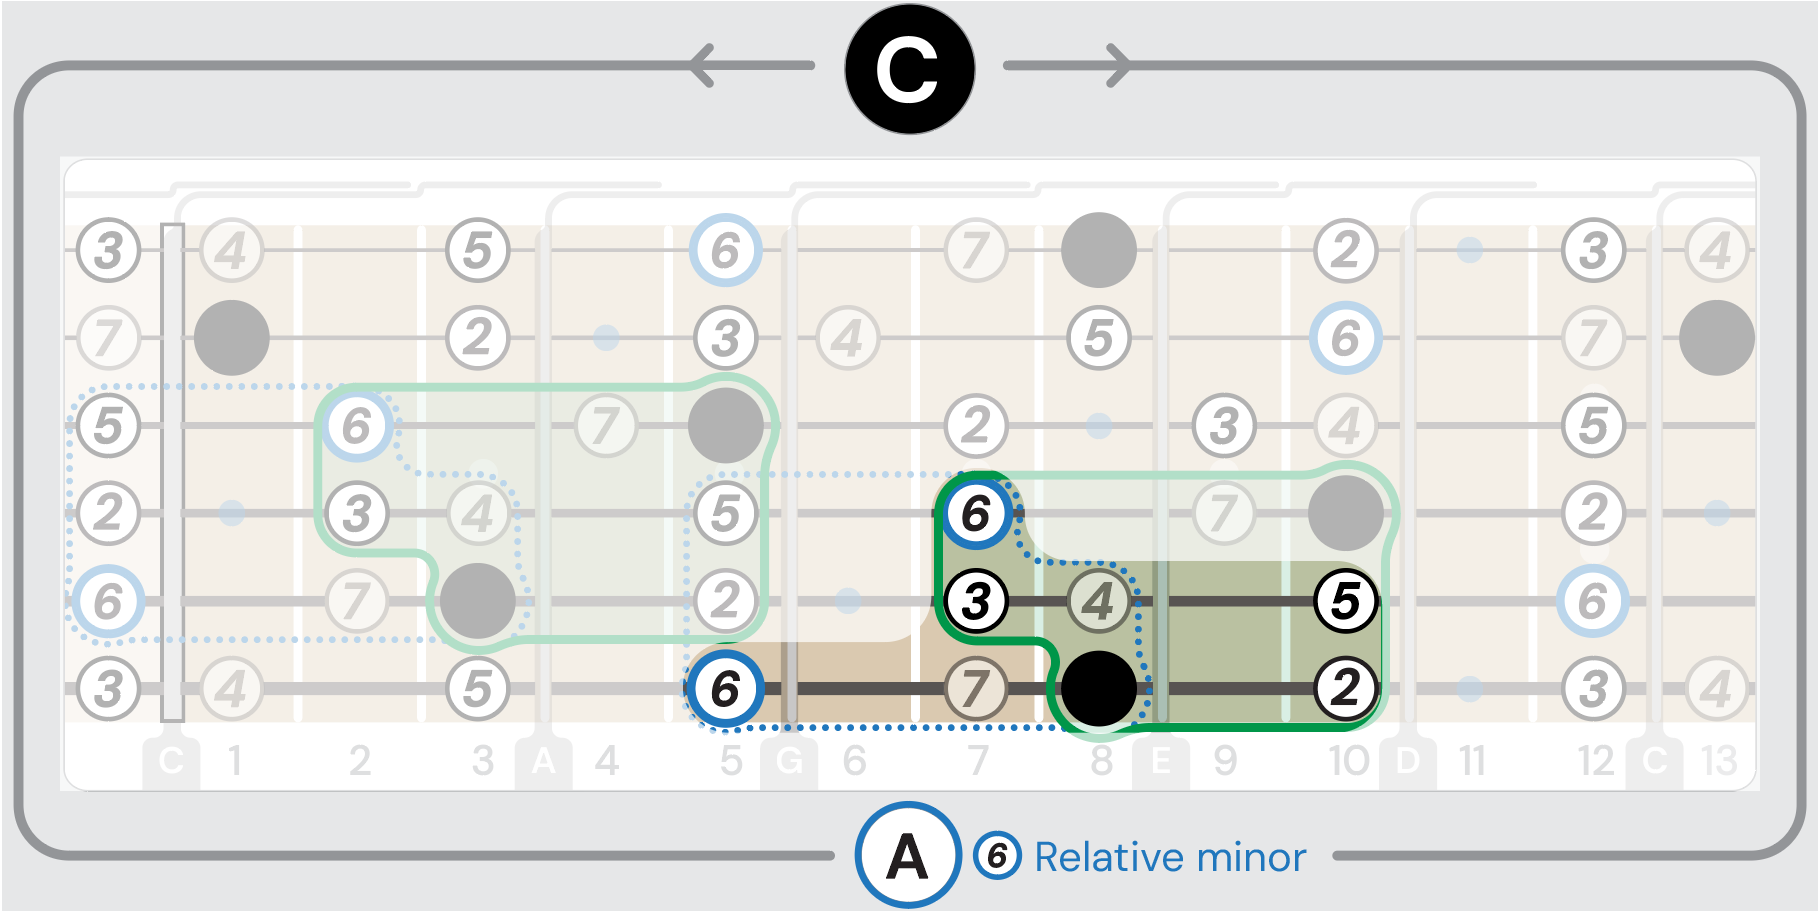
We can do this the other way around too, Try this shape, starting on G on the 3rd fret, then play the next string open as A. Play the 3rd interval on the A string, then move to the open D string for the 5th interval, ending the scale on the 5th fret of the D string. This Major scale uses open strings from the minor shape while still using only a four-fret span of fretted notes. When you move to the E minor chord, you can emphasise the 6 instead and play melodies around it.
Try Adding a Blue Note
By now you might have tried out a few solo options, explored the pentatonic scales and tried mixing and matching Major and minor shapes. These are all essential skills to master in order to write solos you can be proud of.
Now, if you want to add a little extra flavour to your solo, you can add “chromatic” notes in. This basically means notes that exist outside of the scale you are using but can be added to create certain effects. The most common and effective way to do this is by including the “blue note.”
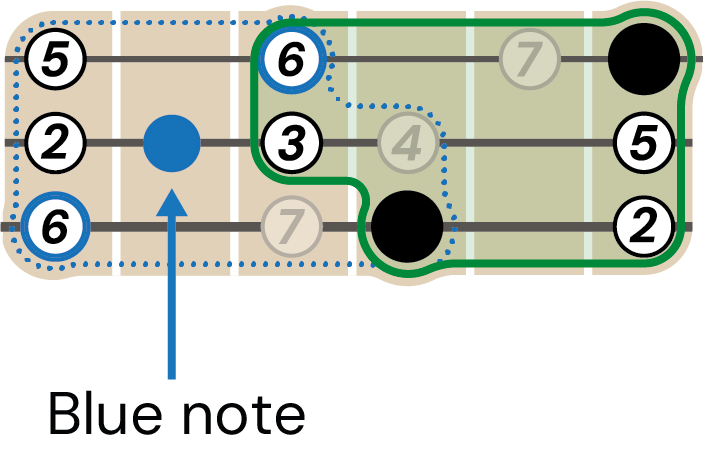
The blue note is named that way because it is often used in blues music, and is therefore part of the blues scales. The blues scales are just the Major and minor pentatonic scales with the addition of the blue note.
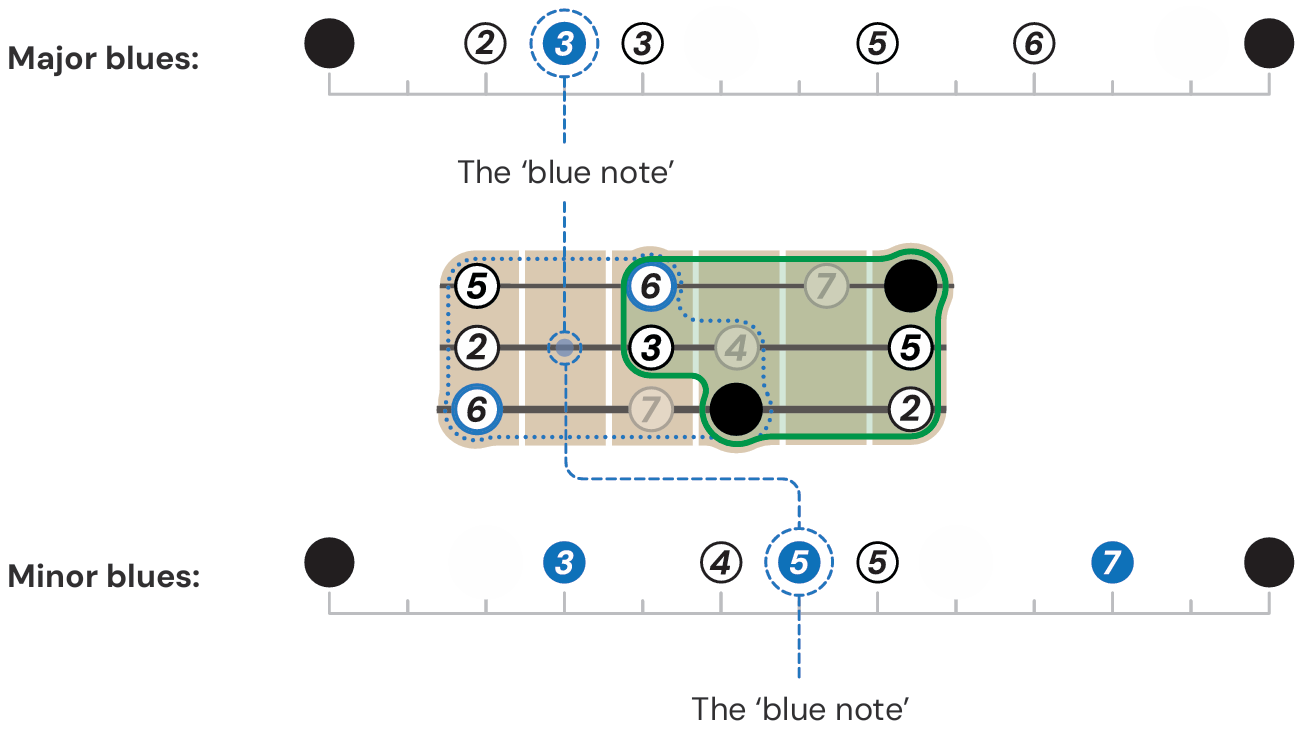
Since it introduces half-step intervals back into the pentatonics, it is a great note to reach for when aiming to add a bit of tension or dissonance to your solos and melodies. You’ll notice its effects instantly when you add it into your existing pentatonic-based solos and riffs.
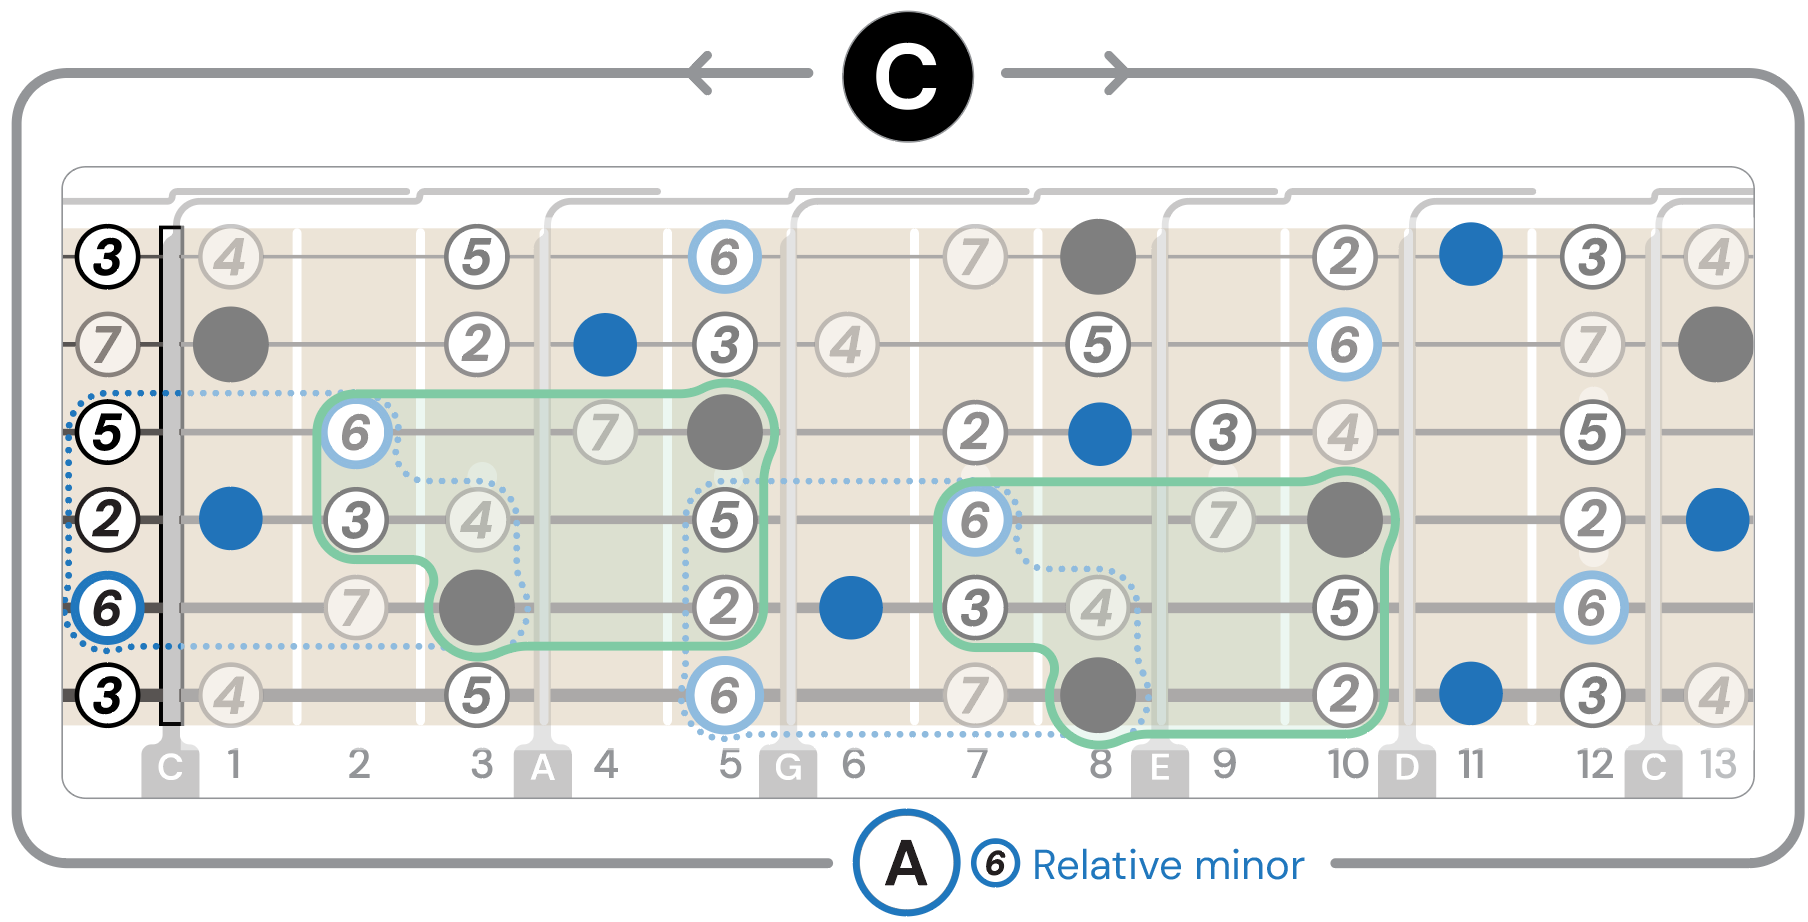
Try hammer-ons, pull-offs for embellishment.
Of course, the most important skill in soloing is to learn your notes and intervals like the back of your hand. But once you’ve done that, you may still feel that you’re not up to the speed and dexterity you want to be. This will only take time and repeated playing to build up naturally, but there are a couple of quick tricks you can learn in the meantime to make your solos sound smoother and more fluid. These techniques work best further up the neck where the frets are closer together, but can also work in the upper half of the neck if you don’t mind stretching your hands a bit more.
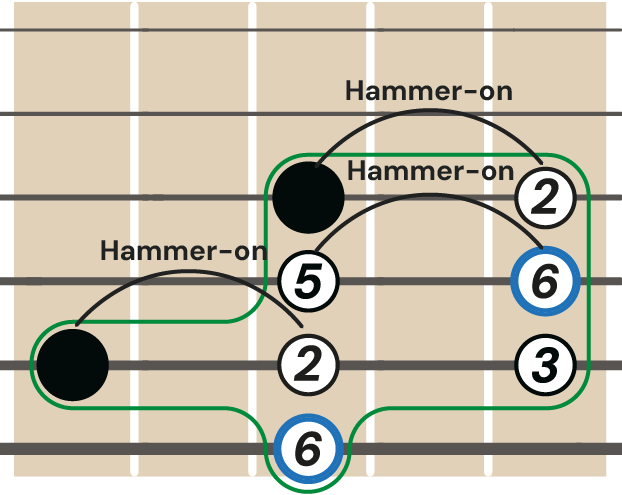
Hammer-ons: These are pretty self-explanatory, you pick a note and then use your finger to “hammer on” the next note directly on the fret, without picking. This technique only works on frets higher than the original picked note.
Let’s try this technique with this G-minor pentatonic shape. Start picking from the 6th interval (G), then pick the root and 2nd intervals, then slide to the 3rd interval to finish off the A string. Next, pick the 5th and 6th intervals and lastly pick the next root note below and the 2nd interval next to it. If you notice, we’re moving through the scale in an ascending motion. This way, you’ll have a better understanding on how learning the scale helps you move across your fretboard easily. You’ll need to experiment a bit with how much force and where exactly on the fret produces the best result, it will be different depending on your guitar.
Pull-offs: This technique does what it says on the tin. This time, you’re picking the higher note, while fretting the lower note, and “pulling off” your finger from the first note. You might need to pull on the string slightly with your pulling-off finger to get it to ring out. Again, just experiment to see what sounds best with your guitar.
Let’s try playing the same scale as before, this time descending through the scale from the last note.
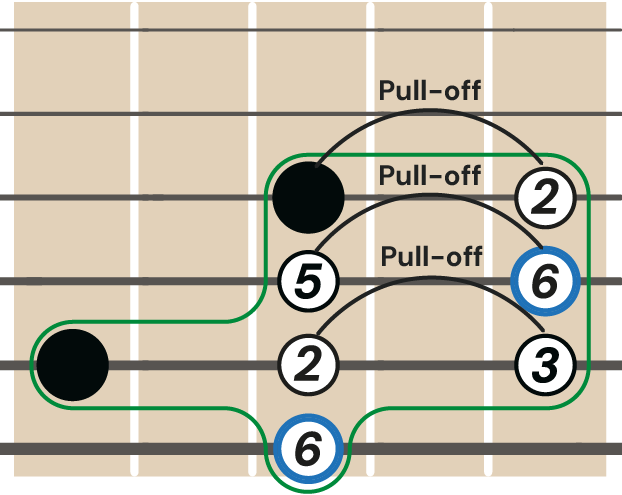
You can also combine hammer-ons and pull-offs to play quick alternating trills. Don’t worry if they sound a bit clumsy initially, these techniques take time to get right. Eventually, you’ll be able to shred your entire solo without strumming once!
Play it for Joy!
“There are no wrong notes…”
-Thelonius Monk
Congratulations!
You’ve made your way through our Learn to Solo guide, you’ve mastered the pentatonics, flirted with the blues and tried some hammer-ons and pull-offs to sound like a real rockstar. These are all essential techniques to have under your belt, but everything is different when you’re playing live.
Don’t fret about playing the perfect scale, or sticking within boxes. Solos are a form of expression after all. Techniques you struggled with on your own may become totally intuitive when playing with a band, and others may become more of a challenge, that’s the beauty of it! You just need to keep on playing.